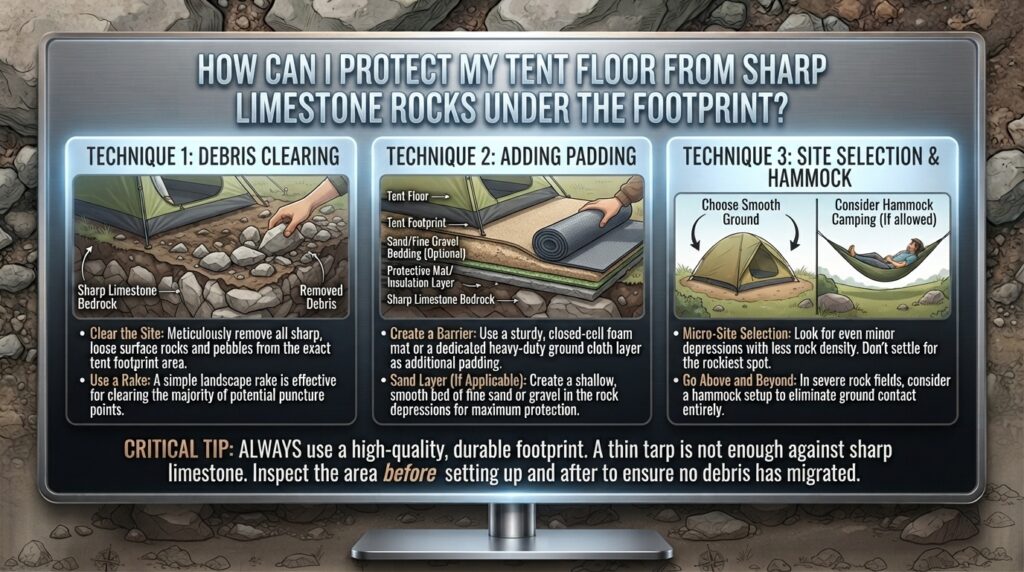
How can I protect my tent floor from sharp limestone rocks under the footprint?

Pitching a tent on rough, rocky terrain is an unavoidable reality for backpackers and car campers across the United States. Whether you are setting up camp on the sharp karst topography of Texas Hill Country, navigating the granite and limestone scrambles of California’s Sierra Nevada, pitching tent in the rocky Adirondacks of New York, or exploring the rugged backcountry of Washington’s Cascade Range, direct contact between your tent floor and sharp limestone rocks can spell disaster.
Limestone is notoriously abrasive. Unlike soft, rounded river stones, weathered limestone often breaks along jagged fracture planes, leaving behind razor-sharp edges and chert inclusions capable of slicing through ultralight silicon-impregnated nylon (Silnylon) or polyurethane-coated polyester (PU) tent floors in a single night.
While a standard factory tent footprint or ground tarp provides basic protection against moisture and mild abrasion, a standard footprint alone is rarely enough to protect against aggressive, needle-sharp limestone.
This comprehensive guide breaks down the exact science of puncture resistance, multi-layered ground protection strategies, region-specific field advice, site clearance protocols, and structural fixes to keep your tent floor pristine on the world’s unforgiving surfaces.
The Geology Problem: Why Limestone Destroys Tent Floors
To protect your tent floor, you first need to understand what makes limestone particularly destructive to outdoor gear.
- Sharp Fracture Patterns: Limestone is a sedimentary rock composed primarily of calcium carbonate. When subjected to physical weathering, freeze-thaw cycles, or mechanical stress, it shatters along brittle joints, forming sharp, wedge-like spalls.
- Chert & Flint Inclusions: Limestone beds frequently contain nodules of chert or flint. Chert is microcrystalline quartz that fractures with a conchoidal break—meaning it produces edges literally as sharp as glass.
- High Weight Concentration: When you lie down, kneel, or place heavy gear inside your tent, your body weight concentrates force onto tiny focal points. A 180 lb camper resting an elbow or heel on a 70D tent floor directly over a 1/8-inch sharp limestone point generates pressure far exceeding the tear and puncture threshold of standard outdoor fabrics.
Fabric Denier vs. Puncture Resistance
Tent floors are measured by Denier (D), which represents the mass in grams of 9,000 meters of the fiber used.
- 20D – 30D Nylon/Polyester: Common in ultralight backpacking tents. Highly susceptible to limestone punctures.
- 60D – 70D Nylon/Polyester: Standard in 3-season backpacking tents. Resistant to light abrasion, but vulnerable to sharp limestone under point pressure.
- 150D – 210D Oxford Polyester: Found in heavy-duty family camping tents. Highly durable, but still susceptible to slice damage over time.
Method 1: The Multi-Layer Ground Protection System
Relying on a single factory footprint when camping on limestone is a gamble. The standard practice for extreme terrain is the Multi-Layer System:
[ INSIDE TENT ]   --> Interior Protective Layer (EVA Foam Pad / Wool Blanket)
--------------------------------------------------------------------------
[ TENT FLOOR ]    --> Factory Silnylon / PU Coated Tent Floor
--------------------------------------------------------------------------
[ GROUND LAYER ]  --> Heavy-Duty Puncture Barrier (Tyvek / Polycryo / HDPE Tarp)
--------------------------------------------------------------------------
[ NATURAL BUFFER ]--> Cleared Organic Detritus / Soft Sand / Natural Mulch
--------------------------------------------------------------------------
[ SUBSTRATE ]     --> Jagged Limestone Bedrock
1. The Secondary Underground Shield (Tyvek vs. Polycryo vs. Heavy-Duty Tarps)
Instead of relying solely on the lightweight footprint that came with your tent, place a specialized high-density barrier underneath the footprint.
Tyvek HomeWrap (Hardwrap 1443R or Commercial)
Tyvek is a high-density polyethylene (HDPE) material manufactured by DuPont. It is virtually tear-proof, highly water-resistant, and provides superior puncture resistance against sharp rock points compared to woven nylon.
- Pros: Exceptionally durable, cheap, easy to trim to size.
- Cons: Slightly heavier than ultralight films; loud and crinkly when brand new (can be softened by washing it once in cold water without soap).
Polycryo (Cross-Linked Polyolefin Film)
Polycryo is the heavy-duty shrink-film used for patio door insulation. While extremely thin, its cross-linked molecular structure gives it incredible tensile strength and puncture resistance for its weight.
- Pros: Ultra-lightweight (under 2 oz), completely waterproof, highly packable.
- Cons: Less abrasion resistance than Tyvek over prolonged use on raw limestone slabs.
Heavy-Duty 10-Mil Woven Poly Tarp
For car camping, nothing beats a thick, heavy-duty polyethylene tarp placed directly beneath the tent footprint.
- Pros: Maximum puncture resistance; completely impervious to sharp stone points.
- Cons: Extremely bulky and heavy; unsuitable for backpacking.
Method 2: Interior Cushioning (Protecting From the Top Down)
Punctures usually happen when force from inside the tent pushes the tent fabric down onto a sharp rock outside the tent. Protecting the top side of the tent floor is just as crucial as protecting the underside.
1. Wall-to-Wall Closed-Cell Foam (CCF)
Covering the internal floor of your tent with 1/8-inch or 1/4-inch closed-cell EVA (Ethylene-Vinyl Acetate) foam pads creates a protective buffer.
- If a sharp limestone point pushes through the outer footprint, the internal EVA foam absorbs the point pressure before it can shear through your sleeping pad or cause a catastrophic rip in the tent floor.
- Products like Gossamer Gear 1/8″ Thinlight pads or Exped FlexMat can be cut to fit your tent’s floor plan exactly.
2. Moving Blankets / Heavy Fleece Mats
For car campers, layering a thick moving blanket, heavy wool blanket, or fitted canvas rug across the interior tent floor prevents boots, cots, camp chairs, and dog claws from pressing the floor fabric into sharp points beneath.
Method 3: Regional Site Clearance Protocols
Every major geographical region presents unique limestone hazards. Here is how to handle limestone camping across key US destinations:
+------------------+----------------------------------+--------------------------------------+
| Target Region    | Limestone Hazard Profile         | Key Protection Strategy              |
+------------------+----------------------------------+--------------------------------------+
| Texas            | Sharp Karst, Honeycomb Rocks     | Heavy Tyvek + Sand/Dirt Buffer       |
| California       | Scree Fields, Mixed Granite/Lime | Dual Footprint (Tyvek + CCF Interior)|
| Washington       | Glacial Moraine, Sharp Spalls   | Polycryo Barrier + Pine Needle Bedding|
| New York         | Exposed Shelf Bedrock            | Moving Blanket + Heavy Poly Tarp     |
| San Francisco    | Coastal Bluffs, Abrasive Shale   | Custom-Cut HDPE Barrier + Stakes     |
+------------------+----------------------------------+--------------------------------------+
1. Texas (Hill Country, Big Bend, Palo Duro)
Texas limestone is famous for “karst” terrain—eroded, jagged, honeycomb-like formations hidden beneath sparse grass.
- Field Tip: Always carry a small camp trowel to clear loose limestone chunks. Fill sharp micro-depressions with loose soil, sand, or gravel before laying your ground cloth.
- Staking Warning: Hard limestone bedrock makes driving standard tent stakes impossible. Use specialized hardened steel rock stakes or the “Big Rock, Little Rock” guyline technique (wrapping guylines around heavy stones rather than driving stakes into rock).
2. California (High Sierra, Mojave, Joshua Tree)
California terrain often features exposed limestone shelves interspersed with abrasive quartz scree.
- Field Tip: Avoid pitching directly on exposed rock shelves if possible. Look for natural sand pockets between rock outcrops.
- Technique: If forced to pitch on solid rock shelves, lay a double barrier (Tyvek under footprint) and weight the internal corners of your tent with gear or water bladders instead of staking.
3. Washington (Cascades, Olympic Peninsula)
Washington’s limestone spalls are often wet, moss-covered, or hidden under thick forest loam.
- Field Tip: Wet limestone reduces friction, allowing sharp rocks to shift underfoot and act like scissors against tent floors. Ensure your ground sheet is trimmed 1 to 2 inches smaller than your tent floor perimeter. If a footprint extends beyond the tent edge, rain falling off the rainfly will pool on top of the tarp, trapping water directly under your tent floor.
4. New York (Adirondacks, Catskills)
In Eastern limestone corridors, exposed shelf bedrock and thin topsoil mean roots and sharp stone edges collide.
- Field Tip: Collect fallen pine needles, leaf litter, or soft duff to construct a 1-inch natural cushion over the sharp limestone points before placing your Tyvek or ground tarp down. Always follow Leave No Trace (LNT) principles by dispersing the leaf litter back to its original state before departing.
Step-by-Step Guide: Pitching Safely on Sharp Limestone
Follow this exact sequence to ensure 100% floor survival on hazardous ground:
[Step 1: Site Inspection] ──> [Step 2: Natural Clearing] ──> [Step 3: Natural Buffer]
                                                                    │
                                                                    ▼
[Step 6: Interior Padding] ◄── [Step 5: Tent Pitch] ◄── [Step 4: Underground Shield]
1.Step 1: Inspect & Clear the Footprint Area:5 Minutes.
Clear an area slightly larger than your tent floor. Sweep away all loose, jagged limestone chips, sharp gravel, and chert fragments using your boot or a stiff branch.
2.Step 2: Fill Depressions & Sharp Points:3 Minutes.
If fixed limestone bedrock protrudes upward, surround the sharp peak with sand, fine dirt, or pine needles to eliminate the drastic height difference and blunt the point.
3.Step 3: Lay Down the Underground Shield:2 Minutes.
Lay down your puncture-resistant barrier (e.g., Tyvek or 10-Mil Poly tarp). Ensure it matches your tent floor shape and sits completely underneath the fly to prevent water collection.
4.Step 4: Lay Factory Footprint & Pitch Tent:10 Minutes.
Place your factory footprint over the ground shield and set up your tent body. Check from the inside by gently pressing down with your hand to feel for any remaining sharp pressure points beneath the floor.
5.Step 5: Install Interior Floor Protection:3 Minutes.
Spread closed-cell foam pads or moving blankets wall-to-wall inside the tent body. Position your primary sleeping pad directly over the safest zones.
Comparison of Footprint Materials for Limestone Ground
| Material | Weight (2-Person Tent) | Puncture Resistance | Water Ingress Resistance | Average Cost | Best For |
| Factory Nylon Footprint (70D) | 7 – 10 oz | Low to Moderate | High (PU Coated) | $30 – $60 | Light forest soil, grass |
| Tyvek HomeWrap (Hard) | 5 – 8 oz | Very High | Excellent | $10 – $15 | Rocky trails, sharp limestone |
| Polycryo Plastic Sheet | 1.5 – 2.5 oz | Moderate (Tension resistant) | 100% Waterproof | $8 – $12 | Ultralight backpacking |
| Heavy Duty Poly Tarp (10-Mil) | 24 – 48 oz | Extreme (Near-indestructible) | 100% Waterproof | $15 – $25 | Car camping, base camps |
| EVA Foam Sheet (1/8 inch) | 4 – 6 oz | High (Distributes point force) | Low (Absorbs pressure) | $20 – $30 | Interior floor protection |
How to Repair a Limestone Puncture or Tear
Despite all precautions, accidents happen. Here is the field-tested method for repairing a damaged tent floor:
Crucial Field Repair Rule: Never use standard duct tape for permanent tent repairs. The adhesive breaks down under heat, leaving a sticky residue that ruins waterproof coatings (Polyurethane and Silnylon).
- Clean the Area: Wipe down both sides of the damaged fabric with an alcohol prep pad to remove dirt and oils.
- Apply Gear Aid Tenacious Tape (Outside): Cut a round patch of Tenacious Tape (rounded edges prevent peeling). Press firmly over the puncture on the underside of the floor while holding the fabric flat.
- Seal with Liquid Adhesive (Inside):
- For Silnylon Floors: Apply a thin layer of Gear Aid Seam Grip SIL (Silicone sealant) over the puncture from the inside.
- For PU-Coated / Polyester Floors: Apply Gear Aid Seam Grip WP (Urethane sealant) over the interior tear.
- Cure Time: Allow 8 to 12 hours to cure fully before folding the tent.
10 Frequently Asked Questions (FAQ)
1. Is a factory tent footprint enough to protect against sharp limestone?
No. Factory footprints are generally designed to shield against dirt, mud, and light abrasion. They are made from lightweight fabrics (typically 20D to 70D) that can easily be punctured under point pressure against sharp, jagged limestone spalls.
2. Can I use a regular hardware store blue tarp under my tent?
Yes, blue tarps offer good abrasion protection, but they must be folded or cut to match your tent’s exact footprint. If any part of the tarp extends beyond the edges of the tent body, it will funnel rainwater directly under your tent, causing pooling.
3. Which side of Tyvek should face up when placed under a tent?
Functionally, both sides of Tyvek HomeWrap offer equal water and puncture resistance. However, placing the printed side facing down keeps your setup looking clean and prevents potential ink rub-off on your tent floor when wet.
4. How do I soften stiff, noisy Tyvek for camping?
Run your Tyvek sheet through a washing machine cycle with cold water and no detergent. Allow it to air dry completely. This breaks down the surface stiffness without degrading its high-density polyethylene fibers or waterproof properties.
5. What should I do if I can’t drive tent stakes into limestone ground?
Use the “Big Rock, Little Rock” (BRLR) staking method. Tie your guyline around a small rock, place it on the ground, and rest a much heavier rock on top of the line behind it. Alternatively, use hardened steel rock stakes (like titanium nail stakes or heavy steel pegs) driven into natural cracks in the rock.
6. Will putting an EVA foam pad inside the tent really prevent floor punctures?
Yes. Punctures occur when weight pressed from inside the tent forces the floor against a sharp point outside. Closed-cell EVA foam absorbs and redistributes point pressure across a wider surface area, preventing the sharp edge from piercing the tent floor.
7. Does limestone damage Silnylon worse than Polyurethane (PU) coated polyester?
Silnylon (silicone-coated nylon) has higher tear strength than PU-coated polyester, meaning it resists ripping once snagged. However, thin Silnylon (15D-20D) can still be punctured easily by sharp points. Higher-denier PU polyester (68D-75D) offers better initial puncture resistance but lower overall tear strength.
8. How do I clear sharp limestone without violating Leave No Trace (LNT) principles?
You can move loose, small stones by hand to clear a level sleeping area. Avoid altering major rock formations, digging large trenches, or damaging native vegetation. Before breaking camp, return all loose stones to their natural positions.
9. What is the lightest way to protect a tent floor from sharp rocks while ultralight backpacking?
The gold standard for ultralight backpackers in rocky terrain is a combination of a 0.7 oz/sq yd Polycryo sheet or 1443R Tyvek underneath the tent, paired with a 1/8-inch full-length EVA foam pad placed under your inflatable sleeping pad inside the tent.
10. How do I clean limestone dust off my tent floor after a trip?
Limestone leaves behind fine, alkaline calcium carbonate dust that can degrade waterproof coatings over time. Pitch your tent at home, hose it down with clean, lukewarm water, gently scrub stubborn dirt with a soft sponge and a tech-wash soap (such as Nikwax Tech Wash), and let it air dry completely in the shade.
Conclusion
Pitching camp on sharp limestone doesn’t have to mean waking up to a ruined tent floor or a deflated sleeping pad. By taking a proactive, multi-layered approach—combining thorough site clearance, a high-density underground barrier like Tyvek, and internal point-pressure distribution with closed-cell foam—you can pitch your tent with total confidence across Texas karst, Sierra granite-limestone mixes, Cascade moraines, or Adirondack shelf rock.
Protecting your gear starts from the ground up: inspect the terrain, layer your defenses, fill natural voids, and always carry a dedicated repair kit for peace of mind in the backcountry.