How do I prevent my tent guylines from slipping off flat-headed nail stakes?

You’ve finally ditched the flimsy, bendable aluminum pegs that came with your tent and upgraded to industrial, heavy-duty hardware nail stakes. Whether you’re car camping along the hard-packed, sun-baked clay soils of Texas, setting up camp on the rocky, wind-swept bluffs near San Francisco, or securing a high-profile canvas wall tent in the dense glacial till of Washington State, these massive steel fasteners give you the pure driving power you need to pierce any terrain without bending.
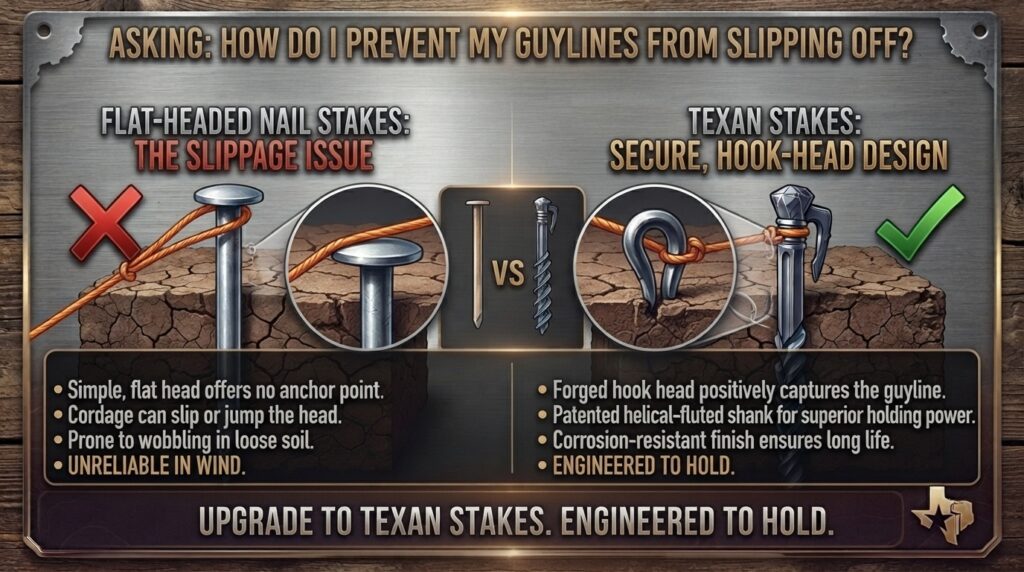
But then your first major storm rolls in. The wind begins to buffet your tent walls, and as the fabric flexes, you notice a catastrophic design flaw: your tent guylines are slipping right over the slick, flat heads of your nail stakes.
Because industrial timber spikes, landscape nails, and basic non-hooked stakes lack a molded hook or an integrated eyelet, they provide zero vertical resistance for your ropes. Under cyclic wind loads, a guyline naturally walks upward until it pops off the flat top, leaving your tent compromised.
Fortunately, this is an incredibly easy and affordable problem to solve. For the community here at besttentstakes.com, this guide explores the physics of guyline slippage and details five field-tested, DIY methods to permanently lock your ropes onto flat-headed nail stakes—no matter how hard the wind blows.
1. The Physics of the Slip: Why Flat-Headed Stakes Fail
To prevent your guylines from slipping, it helps to understand why they move in the first place. When wind hits a tent structure, it exerts a dynamic, multi-directional force. This force travels down the tent fabric, through your tensioners, and directly into the guyline.
       [Tent Body]
           │
           │ (Wind Pulls Up & Away)
           ▼
     [Tent Guyline]
          \
           \  (Angle of Tension)
            \
             ▼ [Flat Head Nail Stake]  <-- Smooth shaft allows line to slip straight up!
If you use a premium, dedicated camping stake (like a forged steel peg), a welded metal horn or cast hook acts as a mechanical block.
When using a flat-headed contractor spike, however, you are relying entirely on friction. If the stake is driven at an incorrect angle, or if the soil shifts slightly under tension, the smooth galvanized zinc or polished steel shaft offers no resistance. The rope loop naturally slides up the shaft, hits the flat head, and pops free.
2. Five Field-Tested Methods to Secure Guylines on Nail Stakes
You don’t need to throw away your heavy-duty nail stakes. With a few cheap hardware store additions or some basic knot-tying knowledge, you can modify them into high-performance, storm-proof anchors.
Method 1: The Paracord Loop and Girth Hitch (The Gold Standard)
This is the most popular, cost-effective modification used by professional overlanders and long-term basecampers. It creates a dedicated, flexible tie-off point right below the head of the nail.
- What You Need: High-visibility 550 paracord (approx. 10 inches per stake) and a lighter to melt the cut ends.
- The Setup:
- Cut a 10-inch length of 550 paracord.
- Tie the two loose ends together using a secure double fisherman’s knot or an overhand loop to create a permanent, closed loop of cord.
- Pass the closed loop around the metal shaft of your nail stake right beneath the flat head.
- Thread one end of the loop through the other (creating a girth hitch or prusik knot) and pull it completely tight against the metal shaft.
- Why It Works: The flat head of the nail prevents the tight paracord hitch from sliding off the top. When you pitch your tent, you simply attach your tent’s guyline hook or aluminum tensioner directly through the dangling paracord loop instead of wrapping it around the cold metal nail.
Method 2: The Double Fender Washer Stack
If you prefer a permanent mechanical barrier that doesn’t rely on fabric or cordage, you can build a solid steel ledge right onto the nail.
- What You Need: One heavy-duty steel fender washer (with an inner hole slightly smaller than the nail head) and one tight-fitting rubber O-ring per stake.
- The Setup:
- Slide the steel fender washer up from the pointed end of the nail stake until it rests flush against the bottom of the flat head.
- Follow it by sliding a tight, industrial-grade rubber O-ring up the shaft, pressing it firmly against the underside of the washer.
- Why It Works: The rubber O-ring acts as a heavy friction lock, compressing the steel washer up against the nail head. This creates a wide, permanent brim that prevents any looping guyline from sliding upward, functioning exactly like a high-end specialty stake.
Method 3: The Clove Hitch Node (No-Hardware Field Fix)
If you are already out in the wilderness of New York’s Adirondacks or camping along the coast of Washington and realize you forgot your modified gear, you can solve the issue purely with knot geometry.
- What You Need: Your existing tent guyline.
- The Setup:
- Instead of simply looping your guyline loosely over the stake, tie a dedicated clove hitch or timber hitch directly around the bare metal shaft of the nail stake.
- Slide the completed knot all the way up so it rests snug against the underside of the flat head.
- Ensure the line leading back to your tent exits from the bottom of the knot profile.
- Why It Works: A clove hitch is a self-tightening friction knot. The harder the tent pulls against the guyline during a heavy wind gust, the tighter the knot constricts around the metal shaft, preventing it from creeping upward.
Method 4: The Bungee Cord Shock Absorber
For high-wind regions like the coastal headlands near San Francisco or the exposed plains of West Texas, sudden high-velocity gusts can break guylines. Adding a rubber buffer solves two problems at once.
- What You Need: Heavy-duty, short industrial loop bungees or thick EPDM rubber tarp straps.
- The Setup:
- Girth-hitch a short, heavy loop bungee right below the flat head of the nail stake.
- Connect your tent’s guyline to the open hook or loop of the bungee.
- Why It Works: The rubber core maintains a tight grip on the nail shaft, preventing upward movement. More importantly, it absorbs the dynamic shock of wind gusts, preventing the stake from rocking back and forth and breaking the soil suction seal.
Method 5: High-Friction Liquid Coating
For a clean, low-profile modification that adds zero bulk, you can chemically increase the friction coefficient of the nail’s smooth metal shaft.
- What You Need: A can of rubberized liquid coating (such as Plasti-Dip or heavy-duty truck bedliner spray).
- The Setup:
- Clean the top 3 inches of your galvanized nail stakes with rubbing alcohol to remove grease.
- Dip or spray the top portion with 2 to 3 thick layers of the rubberized coating.
- Allow it to cure completely for 24 hours before use.
- Why It Works: The cured rubber creates a highly texturized, non-slip surface. When you wrap a guyline around this rubber section, the surface friction keeps the line from sliding upward under load, while also providing high visibility so you don’t trip in the dark.
3. Comparing the Best Fixes for Flat-Headed Nail Stakes
Every camper has different priorities, whether it’s minimizing pack weight for an extended trip or finding the cheapest bulk fix for a massive family canvas tent. Use this data matrix to pick your ideal solution.
| Modification Strategy | Complexity to Build | Added Cost Per Stake | Weight Impact | Field Durability | Best Soil Matching |
| Paracord Loop & Girth Hitch | Low (Under 2 mins) | < $0.15 | Negligible (< 0.1 oz) | High (UV can degrade over years) | Universal (Clay, Dirt, Gravel) |
| Double Fender Washer Stack | Low (No tools required) | $0.30 to $0.50 | Moderate (+ 0.8 oz) | Indestructible (All-metal setup) | Rocky Soils, Glacial Till |
| Clove Hitch Friction Knot | Medium (Requires practice) | $0.00 | Free | Single-use (Must re-tie every setup) | Hardpan, Dense Woods |
| Bungee Shock Absorber | Low (Instant loop) | $0.80 to $1.20 | High (+ 1.5 to 2.0 oz) | Medium (Rubber stretches over time) | High-Wind Open Plains, Deserts |
| Rubberized Liquid Coating | Medium (Requires curing) | $0.20 | Negligible | Medium (Can chip in heavy rocks) | Clay, Soft Loam, Grass lawns |
4. Regional Application Guide: Matching the Fix to Your State
Campground conditions vary wildly across the United States. Here is how to pick your guyline retention method based on where you plan to pitch your tent.
Texas: Dealing with Caliche and High Prairie Winds
Texas camping often means driving stakes into sun-baked clay or subsurface layers of caliche (hardened natural cement blocks), all while dealing with sudden, sweeping prairie winds.
- Recommended Method: The Bungee Shock Absorber or Paracord Loop.
- Why it matters: Because you have to slam your nail stakes deep into the earth with a heavy drilling hammer to penetrate caliche, a solid metal washer can deform or break under off-center hammer blows. A flexible paracord loop or a heavy rubber bungee easily withstands the impact and helps absorb the continuous, punishing winds common across the Texas plains.
Washington: Surviving Wet Glacial Till and Rain-Soaked Loam
In the Pacific Northwest, your primary challenges are incredibly damp forest floor loam, thick underground tree roots, and deep layers of shifting, wet gravelly riverbeds.
- Recommended Method: The Double Fender Washer Stack.
- Why it matters: Wet, muddy soils significantly reduce the holding power of smooth stakes. By installing a wide fender washer flush to the soil line, you don’t just keep the guyline from slipping off the top; you also increase the total surface area pressing down on the mud, creating a stabilizing foot plate that keeps the stake from tilting forward under the weight of rain-soaked tent fabric.
California & San Francisco: Tackling Coastal Bluffs and Rocky Granite
From the dense granitic soils of the Sierra Nevada mountains down to the windy, gravel-heavy coastal sites around San Francisco, California campers face highly abrasive terrains.
- Recommended Method: The Paracord Loop (using reflective cordage).
- Why it matters: Rocky soils require you to constantly shift your stakes around to find gaps between underground rocks. Having a highly visible, flexible loop makes it easy to quickly clip in with a carabiner. Additionally, using reflective cord helps prevent dangerous midnight trips on steep, uneven coastal cliffside campsites.
New York: Managing Rubbery Roots and Forest Hardpan
Setting up camp in New York’s state parks, the Finger Lakes, or the Adirondacks means driving anchors down into dense woodland hardpan filled with tough, rubbery hardwood tree roots.
- Recommended Method: The Clove Hitch or Liquid Rubber Coating.
- Why it matters: When navigating dense underground root systems, you need a streamlined stake profile that can slide cleanly past tight spaces. Bulky washers can get caught on shallow roots, preventing the stake from driving fully flush. A slim, rubberized coating or a direct knot keeps the stake’s profile perfectly narrow, letting you drive it deep without damaging the surrounding root systems.
5. Master Installation Checklist for Heavy Hardware Spikes
To ensure your modified nail stakes hold perfectly in a storm, follow this precise installation sequence:
1.Position the Modification Loop:Set up your primary mechanical block.
Before driving the stake, ensure your paracord loop, washer stack, or rubber coating is pushed completely up to the top, sitting snugly directly underneath the flat head of the nail.
2.Angle the Nail 45 Degrees Away From the Tent:Establish maximum mechanical leverage.
Tilt the nail stake so it forms a sharp 45-degree angle pointing directly away from your tent body. Never drive a flat-headed stake straight vertical; vertical alignment allows the guyline to pull upward parallel to the shaft, maximizing the chances of slippage.
3.Drive the Spike to the Soil Line:Use a heavy drilling hammer for clean impacts.
Using a solid 2-pound or 3-pound steel drilling hammer, strike the flat head squarely. Drive the nail deep until your DIY loop or washer is resting completely flush against the ground. Leaving any portion of the smooth steel shaft exposed creates a lever arm that lets the wind wiggle the stake loose.
4.Connect and Tension Your Guyline:Keep tension vectors aligned correctly.
Attach your tent’s guyline hook directly through your installed paracord loop or underneath the fender washer plate. Pull your line tensioner tight until the line is taut. The pull vector should press your loop down toward the dirt, anchoring it against the soil.
6. 10 Expert Frequently Asked Questions (FAQs)
1. Can I just use a standard knot like a bowline to loop my guyline over a bare nail stake?
While a bowline is an exceptional, unmoving loop knot, it creates a fixed-diameter loop that sits loosely around the metal. Without constant, heavy tension, a loose loop can easily wander up the smooth shaft of a bare nail stake during a storm and slip off the top. To prevent this, you need a self-constricting knot like a clove hitch, or a physical barrier like a washer.
2. Will heating up the nail to weld a custom hook onto it ruin the metal?
Yes, unless you have professional blacksmithing equipment, attempting to heat a galvanized hardware nail with a basic propane torch to weld or bend a hook will destroy its heat treatment, making the steel soft and easy to bend. Additionally, heating galvanized steel releases highly toxic zinc oxide fumes. It is much safer, cheaper, and easier to use simple paracord loops or washers instead.
3. What diameter of paracord is best for making stake loops?
Standard Type III 7-strand 550 paracord (which has a 4mm diameter) is the absolute sweet spot. It is incredibly cheap, widely available in high-visibility colors, has a 550-pound breaking strength, and is thick enough to prevent a girth hitch from sliding past the wide flat head of standard timber or landscape nails.
4. Do rubber O-rings hold up under long-term exposure to direct sunlight?
Standard black nitrile rubber O-rings will eventually dry out, crack, and lose their grip after a few months of intense UV exposure in sunny regions like West Texas. For long-term setups or seasonal camp structures, upgrade to silicone or Viton O-rings, which have exceptional resistance to UV rays and extreme outdoor temperatures.
5. My guylines are made of slick dyneema cord; which modification method works best?
Slick, ultra-lightweight cords like Dyneema or ironwire have a incredibly low friction coefficient, meaning knots like a clove hitch can slip on bare metal. If your tent uses these high-end lines, you should absolutely use Method 1 (The Paracord Loop). You can attach a small aluminum carabiner or a line hook to your dyneema cord and clip it directly into the soft paracord loop, completely bypassing the slick metal shaft.
6. Can I use hot glue to secure a fender washer to the top of my nail stakes?
Hot glue does not bond well to galvanized zinc coatings and will quickly snap off under the heavy vibrations of hammer blows. If you want to permanently fuse a washer to a nail without welding, use a high-strength two-part epoxy or a specialized retaining compound (like Loctite 680) after thoroughly cleaning the metal surfaces with rubbing alcohol.
7. How long should my nail stakes be to guarantee they won’t pull out of the ground?
For standard family camping tents, an 10-inch length with a 3/8-inch diameter is ideal. An 8-inch nail can pull out of soft, rain-soaked soils, while a massive 12-inch or 14-inch timber spike adds unnecessary weight to your kit and is incredibly difficult to extract from dry clay without a crowbar.
8. Will the rubberized liquid Plasti-Dip wear off after hammering the stakes into gravel?
Yes, any painted or liquid-dipped coating on a tent stake is a wearable item. While it will last for a long time in soft loam or clay lawns, driving it repeatedly into sharp granite gravel or rocky riverbeds will eventually scrape the coating off the lower shaft. However, the coating directly underneath the flat head (where your guyline rests) will remain intact and continue to provide excellent slip resistance.
9. Is there a specific knot I should use to loop the paracord if I don’t want to use a girth hitch?
Yes, the Prusik knot is an excellent alternative. It is essentially a double-wrapped girth hitch. It provides twice the surface contact and friction against the smooth metal shaft of the nail stake, making it virtually impossible for the cord to slide down or shift under heavy loads.
10. Can I just file a groove into the side of the nail shaft to catch the rope?
You can use a triangular metal hand file or an angle grinder to cut a small, shallow notch into the side of the nail shaft about an inch below the head. However, this creates a stress concentration point, structurally weakening the stake right where it experiences the most leverage. It is much better to preserve the full structural integrity of the steel and use an external modification instead.
Conclusion: Turning Budget Hardware into Pro Gear
Building a highly authoritative, trusted resource at besttentstakes.com means showing your readers how to solve real-world problems without always forcing them to buy expensive, specialized gear. Using heavy-duty, flat-headed nail stakes from a local hardware store is an incredibly smart, budget-friendly way to secure your tent in unforgiving ground—but only if you know how to manage the risk of guyline slippage.
By implementing simple, field-tested adjustments like paracord loops, fender washer stacks, or proper friction hitches, you completely eliminate the design flaws of contractor fasteners.
Whether you’re dealing with the concrete-like caliche of Texas, the wet mud of Washington, or the rocky coastlines of California, these quick hacks give you a rock-solid, storm-proof basecamp at a fraction of the price of premium outdoor retail alternatives. Pack a few modified spikes in your gear kit, and you’ll never have to worry about a collapsing shelter mid-storm again.