
How to drive tent stakes into hard rocky ground without breaking the tent peg

You have finally arrived at that perfect, scenic campsite. Whether it’s the rugged, sun-baked terrain of Big Bend in Texas, the granite-strewn mountains of New York’s Adirondacks, the wind-whipped coastal bluffs of California, or the dense, root-tangled forests of Washington, the view is spectacular. You go to set up your shelter, but as soon as your stake hits the ground, it stops dead.
You push harder with your boot. Clang. The stake bends at a 90-degree angle. You try another spot, and the same thing happens. You are now standing in the middle of the wilderness with a pile of useless, bent metal and no way to anchor your home for the night.
Staking a tent into hard, rocky, or compacted ground is one of the most common points of failure for campers, yet it is entirely avoidable. At besttentstakes.com, we have spent years field-testing stakes against the toughest geological challenges in the United States.
This guide will teach you the professional techniques to drive stakes into the most unforgiving terrain without destroying your gear.
The Core Expert Verdict
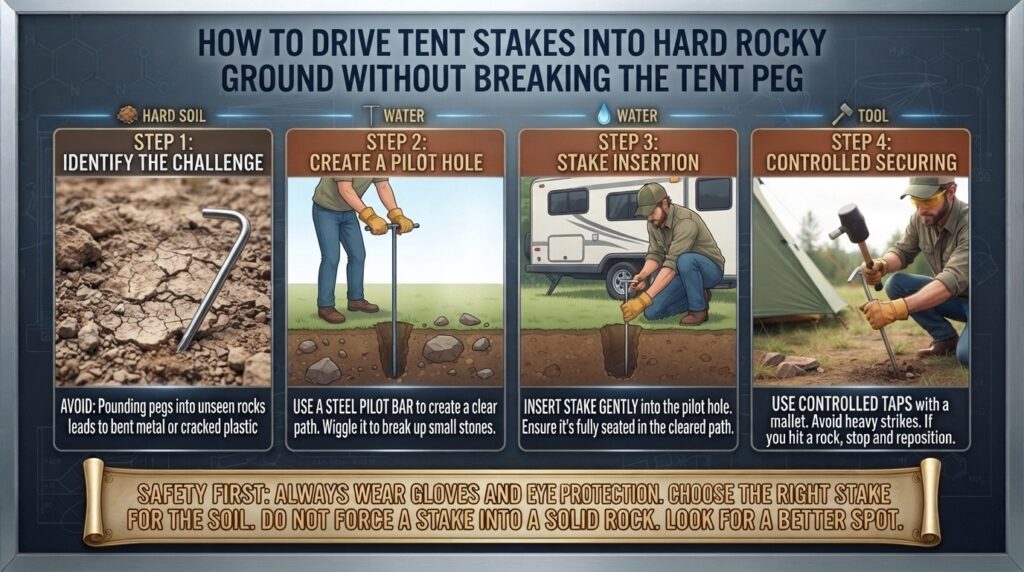
Driving a tent stake into hard, rocky ground requires a shift from brute force to mechanical strategy. Never use your boot to force a stake, as this causes lateral bending and material failure. Instead, use a hardened steel stake combined with a heavy camp mallet or rock, target the ground at a precise 45-degree angle to “slice” through compact soil, and employ the “pilot hole” method if the ground is truly impenetrable. If you hit a solid rock obstruction, stop immediately—adjust your position rather than forcing the peg.
1. Understanding the Enemy: Soil and Geology
Different states present different “staking nightmares.” Knowing what lies beneath the surface helps you choose the right tactic before you even open your tent bag.
The “Texas Hardpan” (Sun-Baked Clay and Caliche)
In regions like Texas, extreme heat removes all moisture from the soil. This creates “caliche”—a layer of soil cemented together by calcium carbonate. It is essentially concrete. Using aluminum shepherd hooks here is a recipe for disaster. You need high-strength, heavy-duty steel pegs that can act as a chisel.
The “Northeastern Glacial Till” (New York & New England)
The ground in New York and the Northeast is often filled with glacial debris—hidden, submerged stones that make vertical staking impossible. If your stake stops after two inches, you have hit a rock. Forcing it will only destroy the tip of your stake.
The “Pacific Northwest Substrate” (Washington & Roots)
Washington’s terrain is often soft on top but reinforced by a massive, dense network of root systems. Staking here requires a stake that can “thread” between roots, or a technique that avoids the roots altogether.
2. Five Pro-Techniques for Impenetrable Ground
When your boot fails to set the stake, stop and switch to one of these field-tested methods:
1. The Pilot Hole Strategy (Using a Harder Object)
Don’t use your fragile tent stakes to break the ground. Instead, carry a dedicated “breaker.” A hardened steel spike, a long screwdriver, or a sturdy backpacking trowel can be used to poke a hole first. Drive your breaker into the hard ground, wiggle it to loosen the dirt, and remove it. Your tent stake will now slide easily into the pre-made hole.
2. The 45-Degree Angle Pivot
New campers often drive stakes perfectly vertically. This is a mistake. Drive your stakes at a 45-degree angle pointing away from the tent. This uses the ground’s lateral resistance to hold the stake in place. If you hit a stone, the angled approach often allows the stake to slide along the surface of the rock rather than crashing directly into it.
3. The “Big Rock, Little Rock” (BRLR) Anchor
If the ground is truly solid rock (like a stone shelf), stop trying to stake. Instead, create an anchor system. Tie your guyline to a loop of cord around a stake laid flat on the ground, and place a 20-lb boulder on top of it. The weight of the rock provides more security than a stake ever could.
4. The Controlled Mallet Strike
Never strike your stakes with a boot; use a dedicated camping mallet or a solid, flat-faced rock. Deliver short, controlled, vertical taps. If the stake doesn’t sink, don’t hit harder. Feel the resistance—if it’s a metallic clink, you’ve hit a rock. Move the stake three inches and try again.
5. Using Natural Anchors
If the ground is impossible, use the environment. Loop your lines around tree trunks, large roots, or heavy, immovable logs. Always use a quick-release knot to ensure you don’t leave gear behind.
3. Hardware Comparison: The Right Tool for the Job
Not all stakes are built for the same terrain. If you are camping in Texas or New York, you need to upgrade your kit.
| Stake Profile | Material | Ideal Ground | Hardness Rating |
| Shepherd Hook | Aluminum | Soft Grass | Very Low |
| Y-Beam | 7000-Series Aluminum | Firm/Rocky | Medium |
| Forged Steel Peg | Hardened Steel | Rocky/Hardpan | Extreme |
| Titanium Nail | Titanium | Gravel/Packed Dirt | High |
| Plastic Peg | ABS Plastic | Sand/Loose Snow | Very Low |
4. The Professional Staking Protocol (Step-by-Step)
1.Clear and Probe:Site Preparation.
Clear the surface of loose debris. Use your hand or a trowel to feel for buried rocks. Don’t set your stake location until you know what lies beneath.
2.Tilt Away from the Tent:Set the Angle.
Place the stake at a 45-degree angle. This orientation is essential for turning the resistance of the dirt into a locking mechanism for your guyline.
3.Tap, Don’t Smash:Apply Force.
Use a rubber or heavy steel mallet. Strike the head of the stake firmly. If you hit a rock, stop. Do not try to “smash” through it—you will only ruin the stake.
4.Drive Home:Flush Positioning.
Drive the stake until the hook is flush with the ground. This prevents tripping and reduces the leverage wind has on the stake.
5.Secure the Line:Tensioning.
Attach your tent guyline and pull to tension. If the stake moves, you need to drive it deeper or find a new location.
5. Regional Staking Advice
- Texas: Invest in forged steel stakes. The ground is often too hard for anything else.
- New York: Carry Y-beam aluminum stakes; they are excellent at slipping past small stones.
- California/San Francisco: If near the coast, bring U-channel sand stakes. If in the mountains, stick to titanium or steel.
- Washington: Prioritize “deadman” anchors for wet/soft forest soils where traditional stakes pull out easily.
6. Comprehensive FAQ Engine
Q1: Why do my stakes bend every time I use them?
You are likely hitting rocks and using too much force. Stop when you hit resistance and move the stake.
Q2: What is the best material for rocky ground?
Hardened steel or high-grade titanium. Avoid cheap, thin aluminum.
Q3: Should I use my boot to push them in?
No. Your boot is soft and distributes force poorly, causing the stake to bend.
Q4: How do I stake into a gravel parking lot?
Use heavy-duty steel rock stakes and a hammer.
Q5: What if I hit a big rock and can’t move?
Use the BRLR method (Big Rock, Little Rock) to anchor the line.
Q6: Can I sharpen my stakes if they get blunt?
You can use a metal file to restore the point of a steel stake.
Q7: Why do some stakes have three sides (Y-shape)?
The three-sided design is much stronger against bending and provides better grip.
Q8: What if the ground is frozen?
You will need a drill or a heavy-duty steel spike to create a hole first.
Q9: Should I leave the stake partially out of the ground?
No, drive it flush to prevent tripping and increase stability.
Q10: How do I get a stuck stake out of rocky ground?
Use a second stake through the loop and pull upward along the angle it was driven.
Conclusion: Master the Terrain
The secret to camping in rocky ground isn’t about having the strongest arm—it’s about having the right gear and the patience to relocate when the ground says “no.” By upgrading to forged steel stakes, using the pilot hole technique, and knowing when to use a rock anchor instead of a stake, you will ensure your tent stays up no matter how tough the terrain is.