
What should I do if my Y-Beam stake hits an unyielding rock shelf just two inches down?

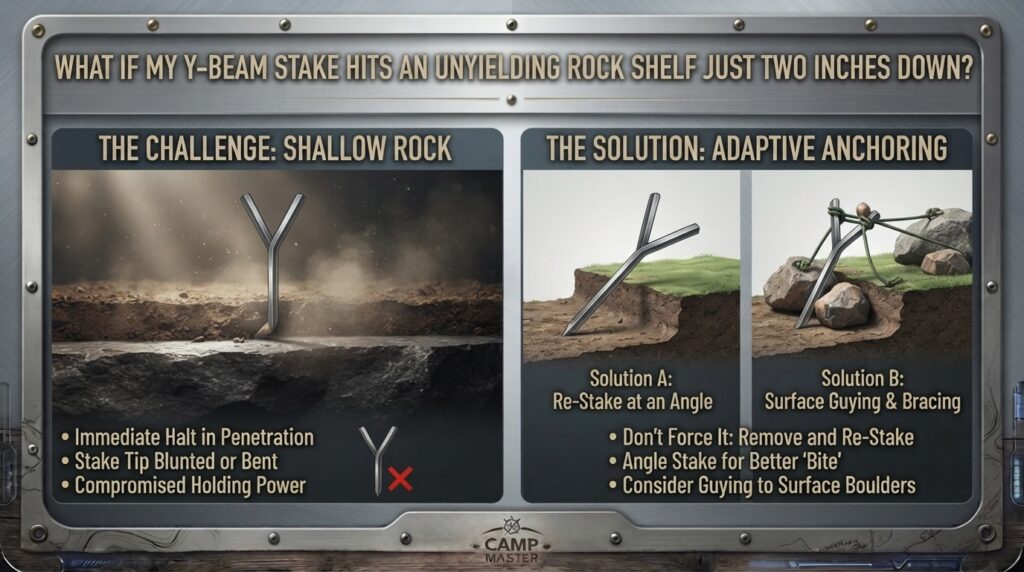
It is the classic backcountry dilemma. You’ve logged 15 miles through the grueling elevation changes of California’s Sierra Nevada, or perhaps you are setting up camp on the wind-swept limestone plates of the Texas Hill Country. The sun is dropping fast, your muscles are aching, and all you want is to crawl into your shelter.
You pull out your premium, ultra-rigid Y-Beam aluminum tent stakes. You place the first one at a perfect 45-degree angle, take a camp rock or mallet, and give it a firm tap.
Clang.
The stake stops dead in its tracks. It has penetrated exactly two inches into the dirt before colliding with an unyielding subterranean rock shelf. You pull it out, move it three inches to the left, and try again.
Clang.
Same result. The entire campsite is sitting on a shallow layer of topsoil covering a massive, solid underground stone shield. If you try to force the Y-Beam stake down with raw hammering power, you will bend the fins, crack the alloy spine, and destroy a $3 piece of engineering. If you leave it sticking ten inches out of the ground, the slightest midnight breeze will pull it loose, causing your tent to collapse.
What exactly do you do?
Fortunately, hitting a stone shelf doesn’t mean you are doomed to a sleepless night or ruined gear. By leveraging advanced anchoring physics and adapting your setup to the soil anatomy around you, you can easily secure your shelter. This comprehensive guide will walk you through immediate field bypass methods, alternative rigging strategies, and terrain-specific hacks tailored for the toughest backcountry floors in the United States.
The Physics of a Partial Stake Depth: Why It Fails
Before exploring the field solutions, it is vital to understand why a Y-Beam stake sticking ten inches out of the earth is a structural disaster.
Tent anchoring relies heavily on leverage and mechanical advantage. When your tent guyline is attached to the top hook or notch of a Y-Beam stake, the wind pulling on the tent acts as a lever arm. The pivot point is the exact line where the stake meets the surface of the dirt.
[ INSECURE SETUP: High Leverage ]             [ SECURE SETUP: Low Leverage ]
          Guyline Pull ↗                                  Guyline Pull ↗
             │                                               │
             ▼ (Top Notch)                                   ▼ (Driven Flush)
             █                                               █▒▒▒█
             █                                               █▒▒▒█
   ~~~~~~~~~~█~~~~~~~~~~ [Ground Level]            ~~~~~~~~~~█▒▒▒█~~~~~~~~~~
          (2" Dirt)                                       (10" Dirt)
If only two inches of the stake are buried, the lever arm above the ground is massive compared to the short anchor below. The lateral force generated by your tent rainfly will effortlessly tilt the stake forward, churning up the loose topsoil until the whole peg pops out.
To make a Y-Beam stake function safely when it hits a rock shelf, you must either eliminate the leverage arm or bypass the earth entirely by using external mass.
5 Field Methods to Overcome a Shallow Rock Shelf
If you hit a solid rock shelf just two inches down, do not panic. Deploy one of these five field-tested techniques based on the gear and natural resources available at your campsite.
Method 1: The “Low-Hitch” Leverage Eliminator
If you absolutely must use the stake in that exact spot, and the topsoil is firm enough to hold a two-inch bite, you can completely neutralize the lever arm using a simple knots-and-rigging trick.
- Drive the Stake to the Shelf: Push the Y-Beam stake down until it firmly strikes the rock shelf at its standard 45-degree angle. Leave the remaining length exposed.
- Reposition the Guyline Loop: Pull your tent’s guyline loop down from the top notch of the stake all the way to the very bottom, right where the metal shaft emerges from the dirt.
- Secure with a Clove Hitch or Loop: Tie a clove hitch or wrap the tension cord securely around the base of the stake at ground level.
- The Structural Impact: By moving the cord to the ground line, you drop the lever arm to zero. The pulling force of the tent is now pulling directly against the two inches of buried metal laterally, rather than trying to tilt it over.
Method 2: The “Big Stone, Little Stone” (BSLS) Anchor
When the underground rock shelf prevents any meaningful penetration, the best solution is to abandon the dirt entirely and rely on gravitational mass. The “Big Stone, Little Stone” method is the gold standard for alpine and desert camping.
- Lay the Stake Flat: Place your Y-Beam stake flat on top of the ground or bedrock, perpendicular to the direction of the tent. Loop your guyline loop securely around the center neck or notch of the flat stake.
- The “Little Stone” Foundation: Place a medium-sized, flat rock (the “Little Stone”) directly on top of the stake shaft to hold it in position and protect the cord from fraying.
- The “Big Stone” Anchor: Find a heavy, substantial boulder (the “Big Stone”—ideally 20 to 30 pounds) and place it directly on top of or immediately behind the little stone, facing away from the tent.
- Tension the System: Tighten your tent’s guyline adjuster. The pulling force will pull the flat stake against the heavy stone structure, creating an immovable friction anchor that handles immense wind loads.
Method 3: The Deadman Anchor (Burying the Stake Horizontally)
If the topsoil is loose sand or gravel resting over a solid shelf, a vertical two-inch stake has zero holding power. Instead of driving it down, bury the shape horizontally.
- Dig a Shallow Trough: Scrape away the two inches of loose topsoil along the surface of the rock shelf to create a horizontal trench.
- Tie to the Center: Tie your tent guyline securely around the middle of the Y-Beam stake.
- Lay It Flat: Drop the stake horizontally into the trench so it acts like a T-bar relative to the tent cord.
- Backfill and Backstop: Pack the loose soil, gravel, and heavy pebbles tightly back into the trench on top of the horizontal stake. Place a flat rock over the burial site to compact the earth. The Y-Beam’s three structural fins will catch the backfilled earth like a wide plow, preventing it from pulling through.
Method 4: The Skewed Angle Sweep
Sometimes the underground shelf isn’t perfectly flat; it may be an angled piece of jagged bedrock or boulder field till. You can use the geometry of the Y-Beam to slide around it.
- Pull and Tilt: Pull the stake back out of the hole. Instead of driving it at the standard 45-degree angle away from the tent, tilt it radically flat—almost parallel to the ground (around 15 to 20 degrees).
- Skim the Shelf: Drive the stake forward so it skims along the top surface of the underground rock layer, wedging itself tightly between the compressed topsoil and the stone shield.
- Watch the Head: Ensure the top notch of the stake remains accessible to catch your line, and keep the open channels of the fins facing downward to grip the soil particles.
Method 5: The Native Object Tether
If your campsite is sitting on a solid sheet of exposed bedrock (common in alpine ranges or river bluffs), stop wasting time trying to use stakes altogether.
- Scout for Fixed Anchors: Look within a six-foot radius of your tent corners for established, heavy natural objects—such as sturdy low tree roots, heavy mountain boulders, or deep cracks in the bedrock.
- Extend Your Lines: Carry extra lengths of lightweight 2mm utility cord (paracord or Dyneema line) in your gear kit. Tie an extension piece to your tent’s primary guyline loop.
- Lasso or Wedge: Loop the extended line around the heavy boulder or tree root. If you find a deep fissure in the rock shelf, you can drop a small pebble tied to your line into the crack, wedging it tightly to form a natural nut anchor (similar to traditional rock climbing protection).
Technical Performance Breakdown of Field Adjustments
| Bypass Method Used | Mechanical Security | Setup Speed | Risk of Gear Damage | Best Terrain Application |
| Low-Hitch Realignment | High | Ultra-Fast | Low | Compact clay over stone |
| Big Stone, Little Stone | Exceptional | Fast | Zero | Exposed bedrock & Alpine |
| Deadman Horizontal Burial | Medium-High | Medium | Zero | Loose gravel / Sand over shelf |
| Skewed Angle Sweep | Medium | Fast | Medium (Can bend tip) | Jagged bedrock / Glacial till |
| Native Object Tether | Exceptional | Slow | Zero | High-alpine forests / Rivers |
Regional Geology: Where Shallow Rock Shelves Happen Most
Understanding the soil composition of your target hiking destinations will help you anticipate these structural obstacles before you pitch your shelter.
1. Central & West Texas (Hill Country to Big Bend)
- The Geological Culprit: Caliche and Flat Limestone Strata.
- The Environment: Texas camping often features a deceptive two to three inches of dry, dusty topsoil covering solid shelves of ancient limestone or highly compressed, bone-hard caliche clay.
- The Strategic Choice: The Big Stone, Little Stone method is mandatory here, as finding loose boulders on the surface is incredibly easy, while digging or driving stakes is practically impossible.
2. California & San Francisco (The High Sierra & Coastal Cliffs)
- The Geological Culprit: Glacial Granite Bedrock and Marine Shale.
- The Environment: Hiking the Pacific Crest Trail through the Sierra Nevada means setting up camp on hard granite slabs covered in a microscopic layer of pine needles and sand. Around San Francisco’s coastal trails, you will hit hard sheets of compressed shale beneath the coastal grasses.
- The Strategic Choice: Deploy the Low-Hitch Realignment if you can find a small dirt pocket, or use Native Object Tethering to wrap lines directly around heavy granite fragments.
3. Washington & The Pacific Northwest (The Cascade Range)
- The Geological Culprit: Compacted Volcanic Rock and River Cobble.
- The Environment: While Washington is famous for deep, wet forest loam, alpine sectors of the Cascades feature shallow soils overlaying old volcanic lava shelves or tightly packed glacial river rocks.
- The Strategic Choice: The Deadman Horizontal Burial works wonders in the wet gravel and loose organic matter frequently found sitting on top of Cascade stone shelves.
4. New York & The Northeast (The Adirondacks & Catskills)
- The Geological Culprit: Metamorphic Bedrock and Buried Glacial Boulders.
- The Environment: The forest floor in New York is an intricate maze. You will frequently drive a stake two inches down only to strike a massive, flat glacial erratic boulder buried completely beneath the moss.
- The Strategic Choice: Use the Skewed Angle Sweep to slide your Y-Beam past the rounded contours of buried boulders, or tie off to the endless network of massive tree roots surrounding your tent.
5 Pro-Tips for Managing Staking Crises in the Field
- Carry Cord Extensions: Never leave home without 20 to 30 feet of spare 1.5mm or 2mm reflective guyline cord. When shallow rock shelves force you to search for alternative anchors, having the extra line length to reach a distant boulder or tree root can save your pitch.
- Listen to the Sound: Pay close attention to the auditory feedback when tapping a Y-Beam stake. A dull thud means you’ve hit a root or compact dirt—keep pushing. A sharp, ringing clang means you’ve struck solid bedrock. Stop striking immediately; continuing to hammer will destroy the stake head.
- Avoid the “Boot Stomp”: When a stake stops two inches down, the natural instinct is to step on it with your full body weight to force it through. With a Y-Beam stake, this lateral unguided pressure will crease the fins, permanently ruining the stake’s structural rigidity.
- Mark Your High-Vis Cord: Always ensure your stakes or guyline extensions are highly visible (neon colors or woven with reflective tracers). When you are running lines out to distant rocks or wrapping them around ground hazards, they become massive tripping hazards in the dark.
- Build a Hybrid Pouch: Don’t carry exclusively Y-Beam stakes. Keep two ultra-slim, rigid titanium nail stakes in your gear pouch. If your Y-Beam hits a stone shelf, you can use a thin nail stake to probe the area and locate a hidden fissure in the rock before driving your wider Y-Beam down.
10 Comprehensive Frequently Asked Questions (FAQs)
1. Will hammering my Y-Beam stake against a rock shelf break it?
Yes. Premium Y-Beam stakes are typically forged from high-grade hardened aluminum alloys like 7075-T6. While this material is incredibly stiff and holds up to immense wind tension, it has low ductility. Striking it repeatedly against solid rock shocks the metal, causing the fins to crease or the entire stake to snap.
2. Can I use a regular knot to tie the guyline to the base of an exposed stake?
Yes, but a Clove Hitch or a simple Taut-Line Hitch works best. The goal is to ensure the knot sits completely flush with the ground line and cannot slide back up to the top notch of the stake when the wind starts pulling on your tent.
3. How heavy does a rock need to be for the “Big Stone, Little Stone” method?
For primary structural corners on a non-freestanding tent, the main anchor stone should weigh at least 20 to 30 pounds (roughly the weight of a large concrete cinder block). For minor vestibule pull-outs or side ventilation flaps, a 10-to-15-pound stone is more than sufficient.
4. What is the difference between a Y-Beam stake and a V-Angle stake when dealing with rock shelves?
A Y-Beam stake has three structural fins, making it virtually impossible to bend by hand, but it displaces a large amount of soil. A stamped V-Angle stake is flatter and can sometimes slide into tighter horizontal gaps between soil and rock shelves more easily than a Y-Beam, but it lacks the absolute multidirectional holding capacity of the Y-shape.
5. Why shouldn’t I just leave the stake sticking 8 inches out of the ground if it’s firmly wedged?
Leaving the stake exposed creates a powerful lever arm. The pull of the tent guyline at the top notch multiplies the lateral force against the shallow dirt layer. The first major gust of wind will tip the stake forward, destroying the hole and causing the anchor to pull free instantly.
6. Can I use the horizontal “Deadman” technique in snow?
Absolutely. In fact, horizontal burial is the primary way to anchor a tent in snow or loose sand. Because frozen snow has very low shear resistance, burying a Y-Beam stake horizontally and stamping the snow down on top of it creates a large underground anchor plate that holds exceptionally well.
7. What should I do if there are no rocks or trees near my campsite to tie off to?
If you are on an absolute sheet of bedrock with no loose stones or native flora, you must rely on the weight of your own gear. You can fill your backpack, extra dry bags, or water bladders with rocks or sand, place them inside or around the corners of your tent, and anchor your interior frame to them.
8. Will the “Skewed Angle Sweep” method ruin the sharp tip of my Y-Beam stake?
It can scrape off the anodized coating and cause minor pitting if it grinds directly against abrasive granite or quartz bedrock. However, as long as you are tapping gently and sliding the stake parallel to the shelf rather than driving it directly head-on into the stone, the structural core will remain safe.
9. Are titanium Y-Beam stakes better at handling rock strikes than aluminum ones?
Titanium Y-Beam stakes are significantly harder and more resilient than aluminum variants, meaning their tips won’t mushroom or dull as easily when hitting stone. However, they are still subject to the same laws of leverage; if left sticking out of the ground, they will pull loose just like an aluminum stake.
10. How do I clean a Y-Beam stake after burying it horizontally in dense clay or mud?
Because Y-Beam stakes feature three open channels, wet clay will pack tightly into the core during a horizontal burial. Let the mud dry slightly, then use the tip of a twig, a tent pole end, or another stake fin to scrape the channel clear before packing it back into your lightweight gear pouch.
Conclusion
Hitting a solid rock shelf just two inches below the surface can be an incredibly frustrating moment at the end of a long hiking day. However, managing it successfully is simply a matter of adjusting to the physics of leverage.
By utilizing the Low-Hitch technique to eliminate the lever arm, adopting the Big Stone, Little Stone approach to harness gravitational mass, or burying your Y-Beam horizontally as a Deadman anchor, you turn an unyielding environmental obstacle into a reliable anchoring foundation.
Keep your gear kit flexible, pack plenty of extra guyline cord, and pay close attention to the soil anatomy of the regions you explore. With these field methods in your backpacking arsenal, you can confidently pitch a secure, windproof shelter on any floor the wilderness throws your way.